 For each block you will need three fabrics.
Two dark fabrics and one light. I chose two blues and a shirting fabric. CW....of course.
From the dark fabric 1, you will need:
(2) 4 1/2 inch squares
(4) 2 1/2 inch squares
From the dark fabric 2, you will need:
(1) 1 1/2 inch strip at least 15 inches long
From the light fabric, you will need:
(1) 1 1/2 inch strip at least 15 inches long

Start by sewing your two 1 1/2 strips, light and dark, together. Press and cut into 1 1/2 inch segments. Use these to make your
 little four patches. They will be 2 inch finished four patches.
 Lay out your block, making sure your light fabrics run diagonally through the block, as shown. I always preview and make sure I like the fabrics I've chosen.
Sew your block together as you would any four patch. Very easy. And so much faster on the machine than by hand!!!
Now, if I were making another 100 blocks, this is how I would do it....
Cut lots of 1 1/2 inch strips. Lights and darks. Sew them together and make lots of little four patches. I like to mix my blocks up so that there are several different fabrics in each block.

Something like this:
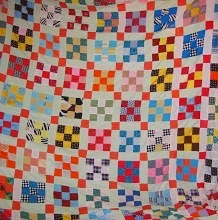
There are three different light fabrics in this block. Some will have 4 different lights and the little four patches will have 3 different darks. I love the scrappy look, so, I made mine as scrappy as I was comfortable with.
If you look at this last pic, you will see that some blocks actually have a medium fabric for the light. As long as there is some contrast it will work. I wouldn't do this in a majority of the blocks, because then it would start looking muddy, but here and there it adds something to the overall design.
 Example: top row, third from left. This red block has a four patch made from a burgandy and a medium red.
Example: bottom row, first block on the left. This block has a dark red and gold four patch. It looks great adding a few here and there.
I love this block because it really is simple, but makes a real graphic statement. Hope you enjoy making these blocks. Let me know if you do, I'd love to see your work.
Happy Quilting!!!!!!!!!!!


9 comments:
Thanks for the tute! As a quilting newbie I'm always on the prowl for good instruction and appreciate every bit you lovely bloggers share!
Sally
Great tute! I've scheduled a link to your post to go live on my blog this afternoon (Central USA time). I hope it brings you a few extra visitors.
Denise
http://needlework.craftgossip.com
Thanks Paula for the tute. The pictures are great and I will keep this block in mind when I am going to start another scrap quilt.
Thanks for a great tutorial. I love the quilt you made with these blocks.
Now it's just me wondering out loud *s* I know this is a traditional block with its traditional name - but really, isn't it a triple four patch?
These are things I think about when I can't sleep *lol*
Hello Paula. Your blog has inspired me! Today I went upstairs and sorted through about six boxes of fabric I have been saving for quilting. I brought down two washer loads and got it all washed, dried and folded, then sorted it according to color.
I am thinking about starting a Cathedral Window quilt.
Your patterns look so neatly done I only hope I can do half as well.
This is a really nice quilt, I especially love the fabrics you have chosen. Good tutorial, thanks
absolutely double dippin' cool!!!
Thanks for this nice and easy tutorial. I've always been attracted to blue and white four patch quilts and think it's time for me to make one.
Have a great day!
I have always been meaning to make one of these.. great tutorial!
Post a Comment