If you decide to make blocks or even a quilt, send me a pic and I'll post them for everyone to see!
For this block you will need:
(1) 4 inch square of muslin or other "light" fabric
(2) 3 inch squares of a "dark" fabric

Place your dark fabric in one corner and sew on the diagonal, from corner to corner. Use any method you would normally use. I like using a piece of green tape on the bed of my sewing machine to help me keep the needle in line with the middle of the square. You can draw a line on the back side of the "dark" fabric and sew on that line, but sometimes it's difficult to see the drawn line.


Cut away the triangle, using a 1/4 inch seam allowance. Keep the triangle lined up carefully. Press the corner of your block open carefully.


Sew this HST (half square triangle) together and set aside to use in another project or as a pieced border later when the top is completed.


I use these small HSTs as leaders & enders between sewing these blocks......Try it, you'll get a rhythm going before too long.
Take the other 3 inch square and place it in the opposite corner, as shown. Sew from corner to corner on the diagonal as before.

Cut away the triangle, using a 1/4 inch seam allowance, as before, keeping the small triangle lined up carefully. Press the corner of your block open.


Sew the other HST together and start a pile. These little HSTs add up quickly.
Here is what you end up with.

Join 4 of these little 4 inch blocks together (3 1/2 in. finished) and you'll have a 7 inch finished block.

Please note, the blocks shown have not been sewn together.
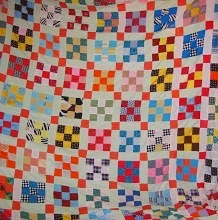
Here is a picture of several lined up, showing more of what the quilt will look like.

Any questions??? Please leave a comment and I'll answer in the comment section.


11 comments:
Dear Paula
Thank you so much for the tutorial. Now I can go and make my own Indian Hatchet quilt.
Thank you so much for sharing!
Millie
Looks really easy, and so pretty!
I'm ready to try it - haven't been in my sewing room all week, so may try a few of these blocks tonight!
Thanks!
Great tutorial. I love all those hst. Thanks for sharing.
Thank you so much for yoru tutorial. Looks so easy and very fun to do. I will give it a try!
Hi there Paula, Just wanted to say what a great tutorial and I just love how the blocks look when all put together. Gotta put this on my to-try list. maybe at the quilt retreat I'm going to next weekend....
I have been looking for an "album" style pattern to do a family tree of sorts. This might be a good on. How would the middle strips look in, say, a light mustard color? Does it only work well with white or cream?
Thanks for sharing these instructions. I am going to try a few.
Have a great day.
Love it! Perfect for using up some of those fabrics you have just a bit of. Then you have the added advantage of the HSTs for more fun!
Thanks!
Two quilts in one! I love it! Great tutorial too.
Thanks for this great tutorial! These blocks look like they would be fun to make.
Post a Comment